
티스토리 뷰

✍️ 이 포스팅은 노마드 개발자 글쓰기 스터디의 일환으로 자유 주제를 공부한 내용으로 포스팅 하고있습니다.
지난주 포스팅에서 화면의 캐릭터를 자동으로 움직이는 부분까지 구현했는데 이번에는 flutter의 바텀시트를 통해 배경인 벽지에 아이템을 놓는 작업을 해보겠습니다.(원래는 캐릭터 옷을 갈아입혀야 하지만 디자인 리소스를 직접 만들어야 할거같아서 바꿔 버렸습니다 😂😂😂)
1. 바텀시트 추가
우선 바텀시트로 사용할 sliding_up_panel 패키지를 추가해줍니다.
henry_some_one/pubspec.yaml 파일에 추가해 주시면 됩니다.
그리고는 바텀시트에 해당하는 위젯과 그 내용물을 만들어줄 파일을 생성해 줍니다.
위와 같이 item_list_bottom_sheet.dart 파일과 item.dart 파일을 추가해줍니다.
그리고 아무런 이미지를 추가해 줄건데 같은 확장자만 가지고 있다면 어떤 이미지던 상관없습니다.
위처럼 assets/images/items 폴더 안에 item_0 ~ item_9 까지의 이미지를 추가해 줬습니다.
이후 바텀시트를 구현해 줍니다.
<item_list_bottom_sheet.dart>
import 'package:flutter/material.dart';

class ItemListBottomSheet extends StatelessWidget {
  final Function(int) onTapItem;
  const ItemListBottomSheet({Key? key, required this.onTapItem}) : super(key: key);

  @override
  Widget build(BuildContext context) {
    return Padding(
      padding: const EdgeInsets.only(top: 20),
      child: GridView.builder(
        shrinkWrap: true,
        physics: const NeverScrollableScrollPhysics(),
        gridDelegate: const SliverGridDelegateWithFixedCrossAxisCount(
          crossAxisCount: 3,
          crossAxisSpacing: 20.0,
          mainAxisSpacing: 10.0,
          childAspectRatio: 100.0 / 50.0,
        ),
        itemCount: 10,
        itemBuilder: (context, index) {
          return InkWell(
            onTap: () => onTapItem.call(index),
            child: Container(
              decoration: BoxDecoration(
                border: Border.all(color: Colors.black12),
              ),
              alignment: Alignment.center,
              child: Image.asset('assets/images/items/item_$index.png'),
            ),
          );
        },
      ),
    );
  }
}
<item.dart>
import 'package:flame/collisions.dart';
import 'package:flame/components.dart';

class Item extends SpriteComponent with HasGameRef {
  int index;
  Item( Vector2 position,
      {required this.index}) :super( position: position,);

  @override
  Future<void> onLoad() async {
    super.onLoad();
    add(RectangleHitbox());
    sprite = await gameRef.loadSprite('items/item_$index.png');
    size = Vector2(40, 40);
  }
}
ItemListBottomSheet 객체를 통해 게임에 추가해줄 아이템을 선택할거고 Item 객체는 실제로 게임에 추가되는 역할을 담당합니다.
이어서 henry_some_one.dart 파일로 돌아와줍니다.
여기에 바텀시트를 추가하고 바텀시트 내부의 아이템을 터치했을때 게임에 추가되는 기능을 넣어줄것입니다.
2. 아이템 받아서 보여주기
<henry_some_one_dart>
class HenrySomeOneGame extends StatefulWidget {
  const HenrySomeOneGame({Key? key}) : super(key: key);

  @override
  State<HenrySomeOneGame> createState() => _HenrySomeOneGameState();
}

class _HenrySomeOneGameState extends State<HenrySomeOneGame> {

  List<int> list = [];

  @override
  Widget build(BuildContext context) {
    return SlidingUpPanel(
      minHeight: 40,
      borderRadius: const BorderRadius.vertical(top: Radius.circular(20)),
      panel: ItemListBottomSheet(onTapItem: onTapItem ,),
      body: GameWidget.controlled(
        gameFactory: () => MyStaticGame(list : list),
        loadingBuilder: (context) => const Material(
          child: Center(
            child: CircularProgressIndicator(),
          ),
        ),
        errorBuilder: (context, ex) => const Material(
          child: Center(
            child: Text('에러났슈'),
          ),
        ),
      ),
    );
  }

  void onTapItem(int index){
    debugPrint(index.toString());
    if(list.contains(index)) return;
    list.add(index);
    setState(() {});
  }
}
HenrySomeOneGame 객체를 위처럼 바꿔줍니다.
List<int> list = [];
위 객체에는 선택된 아이템들의 index 리스트가 담기게 될것입니다.
이제 저 list를 넣어줄 부분을 만들어 줍니다.
class MyStaticGame extends FlameGame with HasCollisionDetection {

  List<int> list;
  MyStaticGame({required this.list});

  @override
  Color backgroundColor() => const Color(0x00000000);

  final GameBackGround _backGround = GameBackGround();
  @override
  Future<void> onLoad() async {
    // 화면 고정
    add(ScreenHitbox());
    await add(_backGround);

    // 플레이어의 사이즈
    final playerSize = Vector2(150, 100);
    // 플레이어의 위치
    final playerPosition = Vector2(200, 600);
    // 플레이어의 위치 및 사이즈 input
    add(AnimatedPlayer(playerPosition, playerSize));
  }

  @override
  void update(double dt) {
    super.update(dt);
    if(list.isEmpty) return;
    Vector2 position = Vector2(list.last * 50, 100);
    add(Item(position, index: list.last));
  }
}
required로 선언된 list를 받는 부분을 만들어 줬습니다.
@override
void update(double dt) {
  super.update(dt);
  if(list.isEmpty) return;
  Vector2 position = Vector2(list.last * 50, 100);
  add(Item(position, index: list.last));
}
그리고는 리스트가 변했을때 어떤 동작을 수행할지에 대해 update 함수에 정의해 두었습니다.
update 함수는 게임 요소에 변화가 있을때 수행됩니다.
gameFactory: () => MyStaticGame(list : list),그리고 게임을 생성할때 list를 인자로 넘겨줍니다.
SlidingUpPanel 에는 위에서 만들어준 ItemListBottomSheet 를 넣어주고 onTapItem 함수를 인자로 넘겨주어 각 아이템을 터치 했을때 어떤 동작을 수행할지 알려줍니다.
void onTapItem(int index){
  debugPrint(index.toString());
  if(list.contains(index)) return;
  list.add(index);
  setState(() {});
}
위 함수는 단순히 '중복이 아닐때 선택된 int 값을 리스트에 추가해준다.' 라는 의미를 가지고 있습니다.
그리고는 setState 함수를 통해 게임의 상태를 새로고침 해줍니다. 그렇게 되면 게임에 적용되는 list의 값이 바뀌게 되는것입니다.
자 이제 아래에서 결과를 확인해 봅시다.
3. 결과 확인!
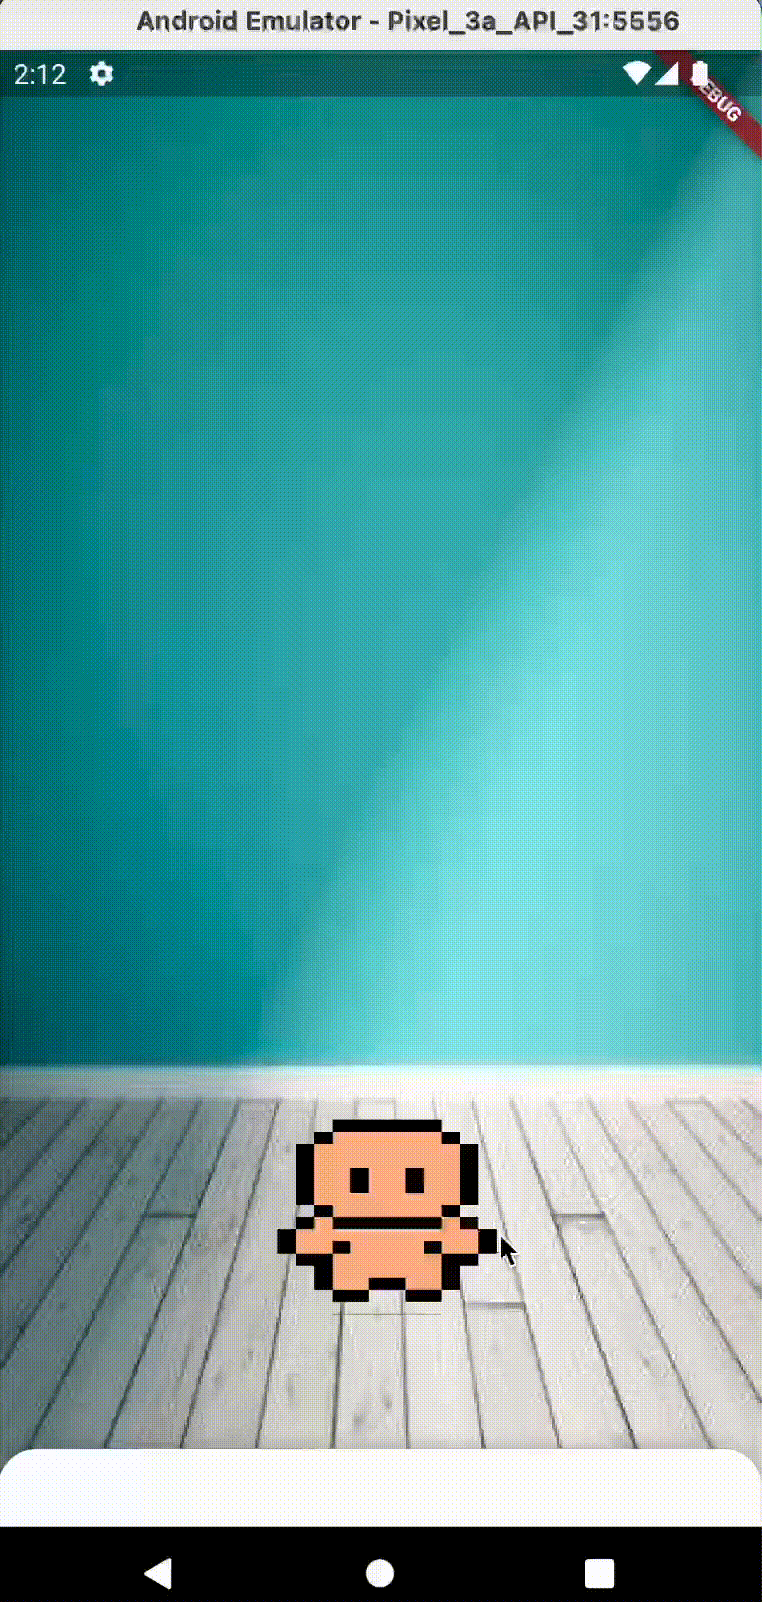
(정말 아무 이미지나 넣었습니다 ㅎㅎ,,)
위 처럼 정상적으로 동작하는것을 볼 수 있습니다.
'플러터' 카테고리의 다른 글
| [플러터] 플러터의 멀티스레드? Isolate! (1) | 2023.05.07 |
|---|---|
| [Flutter Flame] Flame 엔진을 사용한 게임 예제 만들어보기 (4. 完) 펫 넣어주기 (0) | 2022.10.22 |
| [Flutter Flame] Flame 엔진을 사용한 게임 예제 만들어보기 (2) 배경과 자동으로 움직이는 캐릭터 넣기 (1) | 2022.10.08 |
| [Flutter Flame] Flame 엔진을 사용한 게임 예제 만들어보기 (1) 프로젝트 생성 및 계획 (0) | 2022.09.29 |
| [플러터] 자식 높이를 몰라도 되는 위젯 확장 애니메이션 (0) | 2022.09.10 |
- Total
- Today
- Yesterday
- WAS
- django server
- redis
- DART
- flame
- Tutorial
- 플러터
- Hummingbird
- RecyclerView
- 알고리즘
- CHANNELS
- 안드로이드
- Git
- chatting
- 코틀린
- flutter
- github
- 해결
- springboot
- node.js
- mysql
- Android
- password
- 안드로이드스튜디오
- 에러해결
- Android Studio
- 에러
- socket.io
- Django
- Kotlin
| 일 | 월 | 화 | 수 | 목 | 금 | 토 |
|---|---|---|---|---|---|---|
| 1 | ||||||
| 2 | 3 | 4 | 5 | 6 | 7 | 8 |
| 9 | 10 | 11 | 12 | 13 | 14 | 15 |
| 16 | 17 | 18 | 19 | 20 | 21 | 22 |
| 23 | 24 | 25 | 26 | 27 | 28 | 29 |
| 30 |