
티스토리 뷰
이전 포스팅에서 recyclerview를 사용해서 채팅의 기본적인 틀을 만들어 보았습니다.
https://rlg1133.tistory.com/41
Node.js +Android Studio(Kotlin) 채팅 구현하기(1)
이번 포스팅에서는 Backend는 Node.js Frontend는 AndroidStudio를 사용하여 채팅을 구현하는 예제를 만들어 보겠습니다. node.js 는 visual studio code를 사용해서 작업하겠습니다. node.js에는 Socket.io 라이..
rlg1133.tistory.com
이번 포스팅에서는 node.js 서버를 만들고 서로다른 사용자가 한 채팅방에 들어오는것을 작성해보겠습니다.
node.js와 express가 설치되어있고 socket.io 라이브러리를 추가했다는 전제 하에 진행하겠습니다.
socket 통신은 기본적으로
client(안드로이드앱) 에서 서버에 request하고 서버는 수신하고 response 해주는것을 실시간으로 해줍니다.
request나 response를 송신 할때는 socket.emit(), 수신할때는 socket.on()을 사용합니다.
또한 안드로이스 스튜디오 app수준 그래들 파일에 밑의 라이브러리를 추가해줍니다.
implementation 'com.github.nkzawa:socket.io-client:0.3.0'
또한 권한이 필요하기 때문에 Manifest 파일에는
|
1
2
3
4
|
<uses-permission android:name="android.permission.INTERNET" />
<uses-permission android:name="android.permission.ACCESS_NETWORK_STATE" />
<uses-permission android:name="android.permission.WRITE_EXTERNAL_STORAGE" />
<uses-permission android:name="android.permission.READ_EXTERNAL_STORAGE" />
|
밑의 퍼미션들을 추가해줍니다.
이제 위에서 얘기했듯 클라이언트에서 요청하고 -> 서버에서 받고 -> 서버에서 응답을 보내주고 -> 클라이언트에서 받는 작업을 할겁니다.
본인이 원하는 경로에 node.js프로젝트를 만들 파일을 만들어줍니다.
cmd 혹은 비쥬얼스튜디오코드로 콘솔창을 열어 방금 만들어준 파일까지 경로를 옮겨줍니다.
npm install express
npm install socket.io
위 두 명령어를 사용해서 환경을 구성해줍니다.
그러면 폴더안에

위와같이 하나의 폴더와 하나의 파일이 만들어줍니다.
여기에다가 js 파일 하나만 추가해주면 됩니다.
비쥬얼스튜디오 코드를 열어 index.js라는 이름으로 파일을 하나 만들어주고 아래 코드를 복사하고 붙여줍니다.
<index.js>
|
1
2
3
4
5
6
7
8
9
10
11
12
13
14
15
16
17
18
19
20
21
22
23
24
25
26
27
28
29
30
31
32
33
34
35
36
37
38
39
40
41
42
43
44
|
const express = require('express')
const path = require('path')
var app = express();
var http = require('http').Server(app);
// views is directory for all template files
//서버연결하기 직전에뜸
console.log("outside io");
//로그인하면 이거 밑에 두개뜸
console.log('User Conncetion');
console.log("Connected user ");
socket.join(user['roomName']);
io.emit('connect user', user);
});
//메세지 입력하면 서버 로그에 이거뜸
});
});
//맨처음에 서버 연결하면 몇번포트에 서버 연결되어있는지 ㅇㅇ
});
|
주목해야할 부분은 io.on('connection', function(socket){} 안에 둘러쌓인 부분입니다.
통신에관한 부분을 이 중괄호 안에 정의해줄 것입니다.
socket.on('이벤트 이름', function(data)){}
이런식으로 되어있는 형식은
client에서 '이벤트이름' 으로 request하면 함께 보내온 데이터를 가지고 로그를 찍거나 다시 emit을 통해 클라이언트로 응답을 보내는 식입니다.
io.emit('이벤트이름',data);
이런식으로 되어있는 형식은
'이벤트이름'으로 client에 data를 담아서 response 하겠다는 의미입니다.
아래에 새롭게 정의된 activitiy코드를 가지고 비교해보면서 보시면 좋습니다.
<ChatRoomActivity.kt>
|
1
2
3
4
5
6
7
8
9
10
11
12
13
14
15
16
17
18
19
20
21
22
23
24
25
26
27
28
29
30
31
32
33
34
35
36
37
38
39
40
41
42
43
44
45
46
47
48
49
50
51
52
53
54
55
56
57
58
59
60
61
62
63
64
65
66
67
68
69
70
71
72
73
74
75
76
77
78
79
80
81
82
83
84
85
86
87
88
89
90
91
92
93
94
95
96
97
98
99
100
101
102
103
104
105
106
107
108
109
110
111
112
113
114
115
116
117
118
119
120
121
122
123
124
125
126
127
128
129
130
131
132
133
134
135
136
137
138
139
140
141
142
143
144
145
146
147
148
149
150
151
152
153
154
155
156
157
158
159
160
161
162
163
164
165
166
167
168
169
170
171
172
173
|
import android.content.Context
import android.content.SharedPreferences
import android.os.Bundle
import android.text.TextUtils
import android.util.Log
import android.widget.Button
import android.widget.EditText
import android.widget.TextView
import org.json.JSONException
import org.json.JSONObject
import java.text.SimpleDateFormat
class ChatRoomActivity: AppCompatActivity() {
internal lateinit var preferences: SharedPreferences
private lateinit var chating_Text: EditText
private lateinit var chat_Send_Button: Button
private var hasConnection: Boolean = false
private var thread2: Thread? = null
private var startTyping = false
private var time = 2
//리사이클러뷰
var arrayList = arrayListOf<ChatModel>()
val mAdapter = ChatAdapter(this, arrayList)
override fun onCreate(savedInstanceState: Bundle?) {
super.onCreate(savedInstanceState)
setContentView(R.layout.activity_chat_room)
preferences = getSharedPreferences("USERSIGN", Context.MODE_PRIVATE)
//어댑터 선언
chat_recyclerview.adapter = mAdapter
//레이아웃 매니저 선언
val lm = LinearLayoutManager(this)
chat_recyclerview.layoutManager = lm
chat_recyclerview.setHasFixedSize(true)
chat_Send_Button = findViewById<Button>(R.id.chat_Send_Button)
chating_Text = findViewById<EditText>(R.id.chating_Text)
if (savedInstanceState != null) {
hasConnection = savedInstanceState.getBoolean("hasConnection")
}
if (hasConnection) {
} else {
//소켓연결
mSocket.connect()
//서버에 신호 보내는거같음 밑에 에밋 리스너들 실행
mSocket.on("connect user", onNewUser)
mSocket.on("chat message", onNewMessage)
val userId = JSONObject()
try {
Log.e("username",preferences.getString("name", "") + " Connected")
mSocket.emit("connect user", userId)
} catch (e: JSONException) {
e.printStackTrace()
}
}
hasConnection = true
chat_Send_Button.setOnClickListener {
//아이템 추가 부분
sendMessage()
}
}
internal var onNewMessage: Emitter.Listener = Emitter.Listener { args ->
runOnUiThread(Runnable {
val data = args[0] as JSONObject
val name: String
val script: String
val profile_image: String
val date_time: String
try {
Log.e("asdasd", data.toString())
name = data.getString("name")
script = data.getString("script")
profile_image = data.getString("profile_image")
date_time = data.getString("date_time")
val format = ChatModel(name, script, profile_image, date_time)
mAdapter.addItem(format)
mAdapter.notifyDataSetChanged()
Log.e("new me",name )
} catch (e: Exception) {
return@Runnable
}
})
}
//어플 키자마자 서버에 connect user 하고 프로젝트에 on new user 실행
internal var onNewUser: Emitter.Listener = Emitter.Listener { args ->
runOnUiThread(Runnable {
if (length == 0) {
return@Runnable
}
//Here i'm getting weird error..................///////run :1 and run: 0
var username = args[0].toString()
try {
val `object` = JSONObject(username)
username = `object`.getString("username")
} catch (e: JSONException) {
e.printStackTrace()
}
})
}
fun sendMessage() {
preferences = getSharedPreferences("USERSIGN", Context.MODE_PRIVATE)
val now = System.currentTimeMillis()
val date = Date(now)
//나중에 바꿔줄것
val sdf = SimpleDateFormat("yyyy-MM-dd")
val getTime = sdf.format(date)
val message = chating_Text.getText().toString().trim({ it <= ' ' })
if (TextUtils.isEmpty(message)) {
return
}
chating_Text.setText("")
val jsonObject = JSONObject()
try {
jsonObject.put("script", message)
jsonObject.put("date_time", getTime)
} catch (e: JSONException) {
e.printStackTrace()
}
Log.e("sendmmm",preferences.getString("name", "") )
}
}
|
처음에 소켓을 선언해주는곳에 있는 url은 필자의 로컬을 열어서 외부에서 접속 가능하게 해주는 ngrok라는 프로그램을 사용해서 받은 url이다.
이에관한 포스팅은
https://rlg1133.tistory.com/23
ngrok 사용법
https://ngrok.com/download ngrok - download Download & setup ngrok Get started with ngrok in just a few seconds. Download ngrok First, download the ngrok client, a single binary with zero run-time d..
rlg1133.tistory.com
위 포스팅에서 볼 수 있다.
이제 코드를 천천히 살펴보자면
처음에 소켓을 선언하고
|
1
2
|
mSocket.on("connect user", onNewUser)
mSocket.on("chat message", onNewMessage)
|
위 두코드를 선언해 주는데 하나만 보자면 서버에서 connect user라는 이벤트를 받으면 onNewUser 에미터를 실행하겠다는 의미이다.
|
1
2
3
4
5
6
7
8
9
10
11
|
val userId = JSONObject()
try {
Log.e("username",preferences.getString("name", "") + " Connected")
mSocket.emit("connect user", userId)
} catch (e: JSONException) {
e.printStackTrace()
}
|
그다음 나오는 위 코드를 보면 쉐어드에 저장해놓은 내 이름과 roomName을 JSONObject에 담아주는데
이 roomName은 채팅방 이름이라고 보면 된다. node.js에는 room 이라는 기능이 있어서 방을 나눠서 특정 키값을 가진 사람끼리만 대화 할 수 있게해준다.
지금은 필자가 roomName을 임의로 room_example이라고 정의를 해두었다.
따라서 이 앱을 실행하면 모든 사용자가 room_example 이라는 이름의 방으로 들어가 채팅을 하게된다.
이름을 입력하던 MainActivity에서 참여할 채팅방 이름을 스스로 입력하게 수정해서 1:N채팅을 구현하거나
조금더 고유한 키를 가지게 해서 1:1 채팅을 구현하는것도 어렵지 않게 할 수 있다.
이러한 roomName을 가진 userId jsonobject를 mSocket.emit("connect user", userId) 에 담아서 서버로 요청한다.
그러면 위 index.js 파일의
|
1
2
3
4
5
6
7
8
|
console.log("Connected user ");
socket.join(user['roomName']);
console.log("roomName : ",user['roomName']);
io.emit('connect user', user);
});
|
이부분의 socket.on에서 수신해서 동작한다.
서버 로그에 Connencted user라는 로그가 찍히며
socket.join() 을 통해 룸에 참가할 수 있다.
위에 안드로이드이 코드에서 전송한 userId가 여기서는 user 이며, userId에 넣어놓은 roomName은 여기서 user[roomName]으로 꺼내어 그 방으로 join할 수 있다.
또한
console.log("state : ",socket.adapter.rooms); 를 통해서 현재 소켓에 어떤 룸에 누가 접속해 있는지 콘솔에서 출력해볼 수 있다.
그아래에 io.emit('connect user', user)코드는 서버에서 요청을 받았으니 클라이언트의 connect user에미터를 실행해 주겠다는 의미이다.
그러면
|
1
2
|
mSocket.on("connect user", onNewUser)
|
안드로이드 스튜디오의 위 코드에서 onNewUser에미터를 실행한다.
그럼이제 본격적으로 채팅 메세지를 보내는 부분을 살펴보자
|
1
2
3
4
5
|
chat_Send_Button.setOnClickListener {
//아이템 추가 부분
sendMessage()
}
|
chat_Send_Button을 클릭하면 sendMessage()함수가실행된다.
|
1
2
3
4
5
6
7
8
9
10
11
12
13
14
15
16
17
18
19
20
21
22
23
24
25
26
27
28
29
30
|
fun sendMessage() {
preferences = getSharedPreferences("USERSIGN", Context.MODE_PRIVATE)
val now = System.currentTimeMillis()
val date = Date(now)
//나중에 바꿔줄것
val sdf = SimpleDateFormat("yyyy-MM-dd")
val getTime = sdf.format(date)
val message = chating_Text.getText().toString().trim({ it <= ' ' })
if (TextUtils.isEmpty(message)) {
return
}
chating_Text.setText("")
val jsonObject = JSONObject()
try {
jsonObject.put("script", message)
jsonObject.put("date_time", getTime)
} catch (e: JSONException) {
e.printStackTrace()
}
Log.e("sendmmm",preferences.getString("name", "") )
}
|
입력한 채팅과 현재시간, 그리고 내이름값을 받아와서 jsonobject에 집어넣는다
//이미지는 url에서 받아오는 작업을 뺏기때문에 기본이미지로 넣어주기위해 아무값이나 집어넣는다.
mSocket.emit("chat message", jsonObject) 위 코드를 통해 서버에 요청을 보내면
index.js의
|
1
2
3
4
5
|
console.log("Message " + msg['message']);
console.log("보내는 아이디 : ",msg['roomName']);
});
|
위부분이 요청을 받는데 서버는 요청을 받아서 다시 client의 chat message요청에 msg값을 담아 보낸다.
|
1
2
|
mSocket.on("chat message", onNewMessage)
|
그러면 onNewMessage 에미터가 실행하게 된다.
|
1
2
3
4
5
6
7
8
9
10
11
12
13
14
15
16
17
18
19
20
21
22
23
24
|
internal var onNewMessage: Emitter.Listener = Emitter.Listener { args ->
runOnUiThread(Runnable {
val data = args[0] as JSONObject
val name: String
val script: String
val profile_image: String
val date_time: String
try {
Log.e("asdasd", data.toString())
name = data.getString("name")
script = data.getString("script")
profile_image = data.getString("profile_image")
date_time = data.getString("date_time")
val format = ChatModel(name, script, profile_image, date_time)
mAdapter.addItem(format)
mAdapter.notifyDataSetChanged()
Log.e("new me",name )
} catch (e: Exception) {
return@Runnable
}
})
}
|
위처럼 sendmessage() 에서 담아준 데이터들이 서버를 거쳐서 다시 클라이언트로 돌아와 ChatModel 객체에 담겨 리사이클러뷰에 추가가 된다.
여기서 다른 사용자들이 추가한 데이터들도 서버를 통해 나에게 와 상대방 메세지로서 내 리사이클러뷰에 추가가 된다.
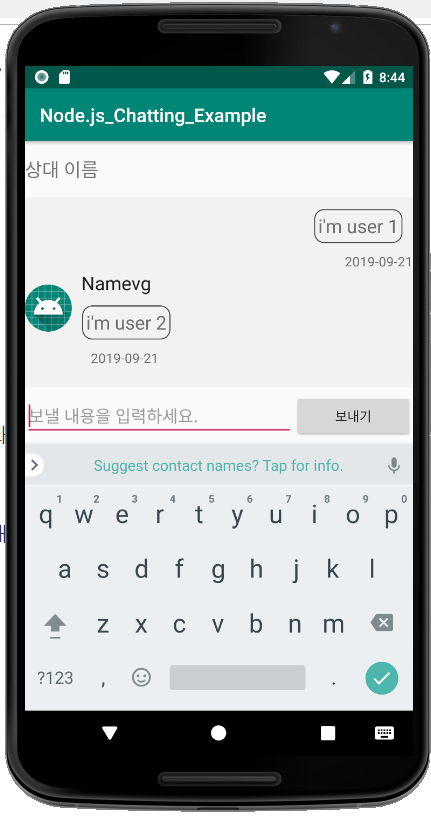
화면은 위와같이 구성된다.
//참고로 본 예제에서는 이름 중복확인이 없기때문에 실제 구현에서는 name 중복확인을 넣거나 혹은 viewtype비교를 name이 아닌 다른 고유값을 사용해야함
https://github.com/Gyeony95/Nodejs_Chatting_Example
Gyeony95/Nodejs_Chatting_Example
Node.js + Android Studio Chatting Example // https://rlg1133.tistory.com/41 - Gyeony95/Nodejs_Chatting_Example
github.com
이번에 만든 예제는 위 깃헙주소에 올려 두었습니다.
'Tutorial' 카테고리의 다른 글
- Total
- Today
- Yesterday
- node.js
- Django
- 알고리즘
- Hummingbird
- 에러
- mysql
- django server
- DART
- 안드로이드스튜디오
- WAS
- CHANNELS
- Git
- socket.io
- 안드로이드
- chatting
- Android Studio
- springboot
- password
- Android
- flame
- Tutorial
- RecyclerView
- flutter
- github
- 플러터
- redis
- Kotlin
- 에러해결
- 코틀린
- 해결
| 일 | 월 | 화 | 수 | 목 | 금 | 토 |
|---|---|---|---|---|---|---|
| 1 | 2 | 3 | ||||
| 4 | 5 | 6 | 7 | 8 | 9 | 10 |
| 11 | 12 | 13 | 14 | 15 | 16 | 17 |
| 18 | 19 | 20 | 21 | 22 | 23 | 24 |
| 25 | 26 | 27 | 28 | 29 | 30 | 31 |